Pre Trip Inspection Checklist PDF Form
Before hitting the road, ensuring that your vehicle is in optimal condition is crucial for safety and compliance. The Pre Trip Inspection Checklist serves as a vital tool for drivers, helping them assess their vehicle's readiness. This checklist typically includes sections for inspecting critical components such as brakes, lights, tires, and fluid levels. Each item on the list requires careful examination to identify any potential issues that could lead to breakdowns or accidents. Additionally, the form may prompt drivers to check for proper load securement and overall vehicle cleanliness. By systematically going through this checklist, drivers not only protect themselves but also contribute to the safety of others on the road. Completing the Pre Trip Inspection Checklist is not just a regulatory requirement; it is a proactive step toward ensuring a safe journey.
Common mistakes
-
Skipping Sections: Many people overlook certain sections of the checklist. Each part is important for ensuring safety. Missing even one item can lead to serious issues on the road.
-
Not Being Thorough: Some individuals rush through the inspection. Taking time to carefully examine each component is crucial. A quick glance might not catch potential problems.
-
Inaccurate Reporting: Errors in writing down findings can occur. If a tire is low on air, it should be noted accurately. Misreporting can lead to misunderstandings and unsafe conditions.
-
Ignoring Previous Issues: Failing to address problems noted in prior inspections is common. Always check for unresolved issues. This practice helps maintain vehicle safety over time.
-
Not Using the Right Tools: Some people forget to use necessary tools during the inspection. A tire gauge or flashlight may be required for a thorough check. Without these, important details might be missed.
-
Failing to Sign and Date: Neglecting to sign and date the checklist can create confusion. Documentation is essential for accountability. Always ensure the form is completed properly.
Example - Pre Trip Inspection Checklist Form
Class A CDL
 ®
®
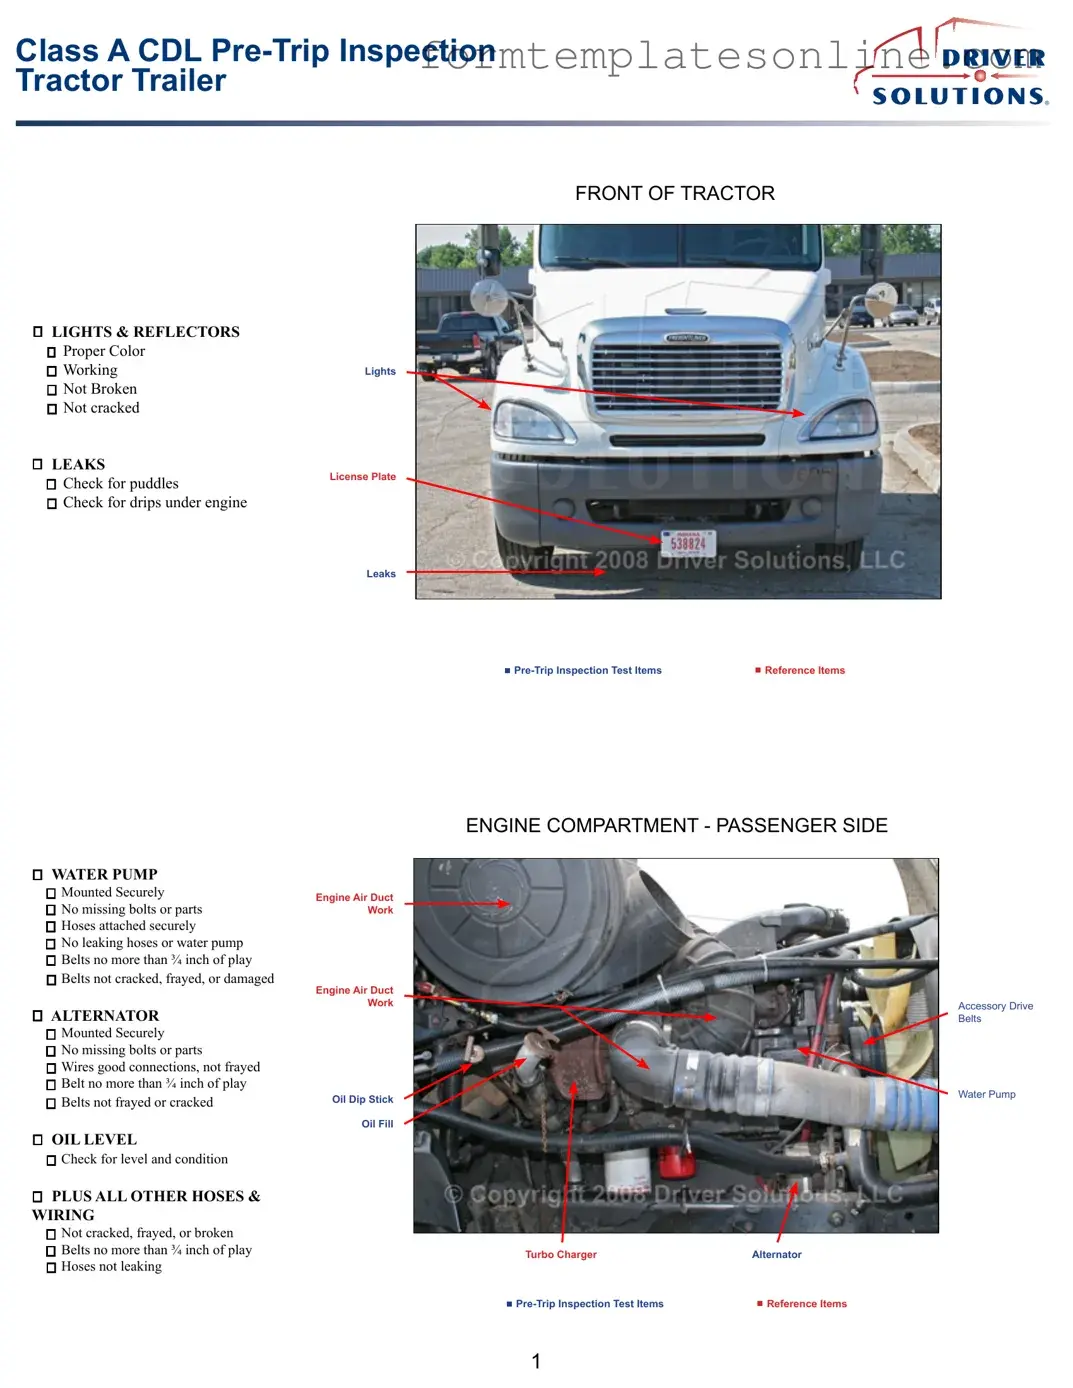
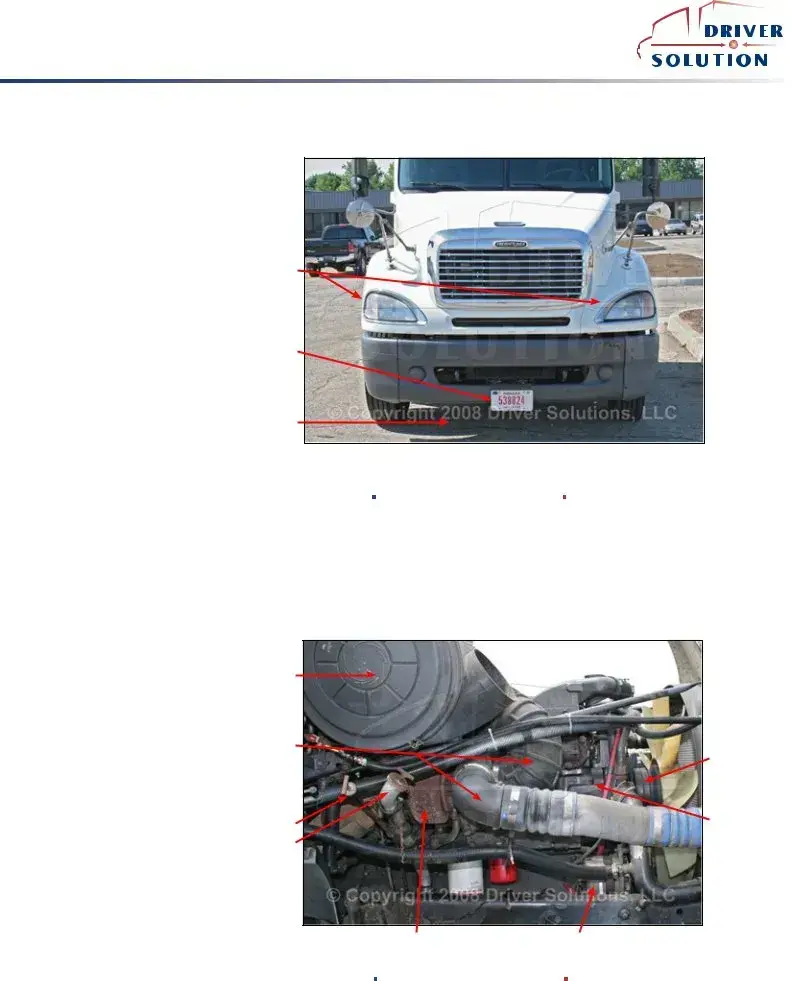
FRONT OF TRACTOR
LIGHTS & REFLECTORS o Proper Color
o Working
o Not Broken o Not cracked
LEAKS
o Check for puddles
o Check for drips under engine
Lights
License Plate
Leaks
Reference Items |
ENGINE COMPARTMENT - PASSENGER SIDE
WATER PUMP o Mounted Securely
o No missing bolts or parts o Hoses attached securely
o No leaking hoses or water pump o Belts no more than ¾ inch of play
o Belts not cracked, frayed, or damaged
ALTERNATOR
o Mounted Securely
o No missing bolts or parts
oWires good connections, not frayed
oBelt no more than ¾ inch of play
oBelts not frayed or cracked
OIL LEVEL
oCheck for level and condition
PLUS ALL OTHER HOSES & WIRING
oNot cracked, frayed, or broken
oBelts no more than ¾ inch of play o Hoses not leaking
Engine Air Duct Work
Engine Air Duct Work
Oil Dip Stick
Oil Fill
|
Accessory Drive |
|
Belts |
|
Water Pump |
Turbo Charger |
Alternator |
Reference Items |
1
Class A CDL
 ®
®
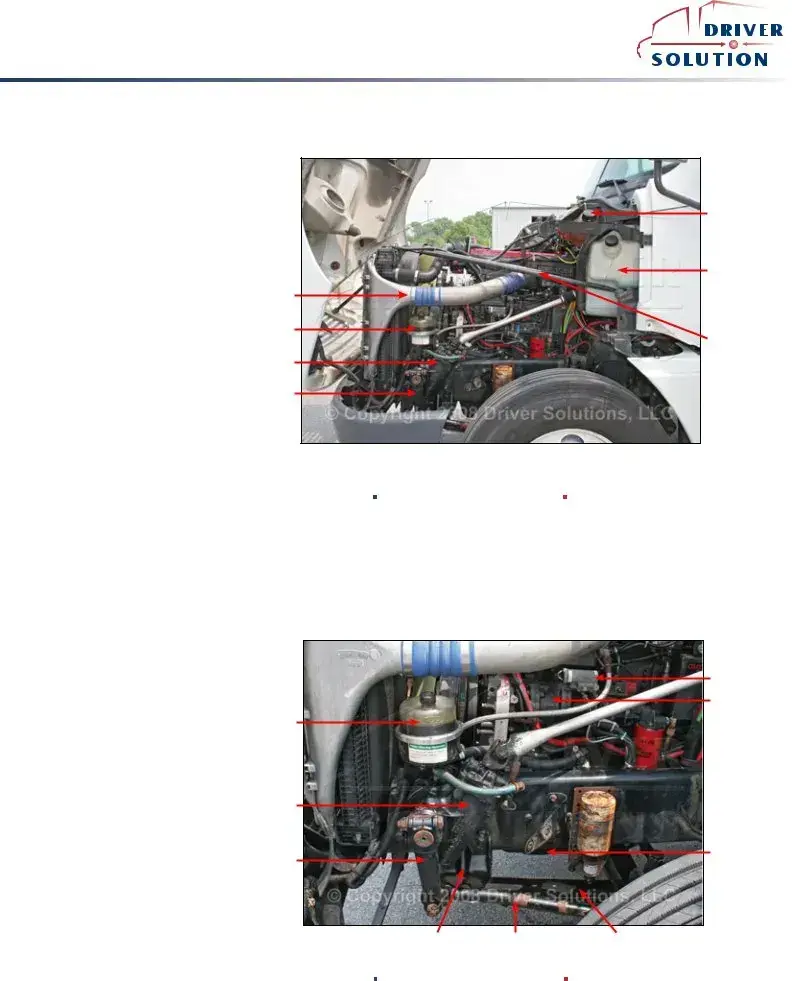
ENGINE COMPARTMENT - DRIVER SIDE
COOLANT
oCheck for level and condition
oHoses attached and not leaking
POWER STEERING RESERVOIR
oMounted properly
oHoses attached and not leaking
oCheck for level and condition
AIR COMPRESSOR
oMounted Securely
oNo missing bolts or parts
oNo air leaks at lines
oCheck if gear or belt driven
oBelt no more than ¾ inch of play
oBelts not cracked or frayed
STEERING GEAR BOX
oMounted properly
oNo missing parts, nuts or bolts o Lines and hoses not leaking or broken
|
Engine Coolant |
|
Reservoir |
|
Windsheild |
|
Washer Fluid |
|
Reservoir |
Engine Air Duct |
|
Work |
|
Power Steering |
|
Reservoir |
Radiator Brace |
|
|
Steering Gear |
|
Box |
|
Pitman Arm |
|
Reference Items |
POWER STEERING RESERVOIR |
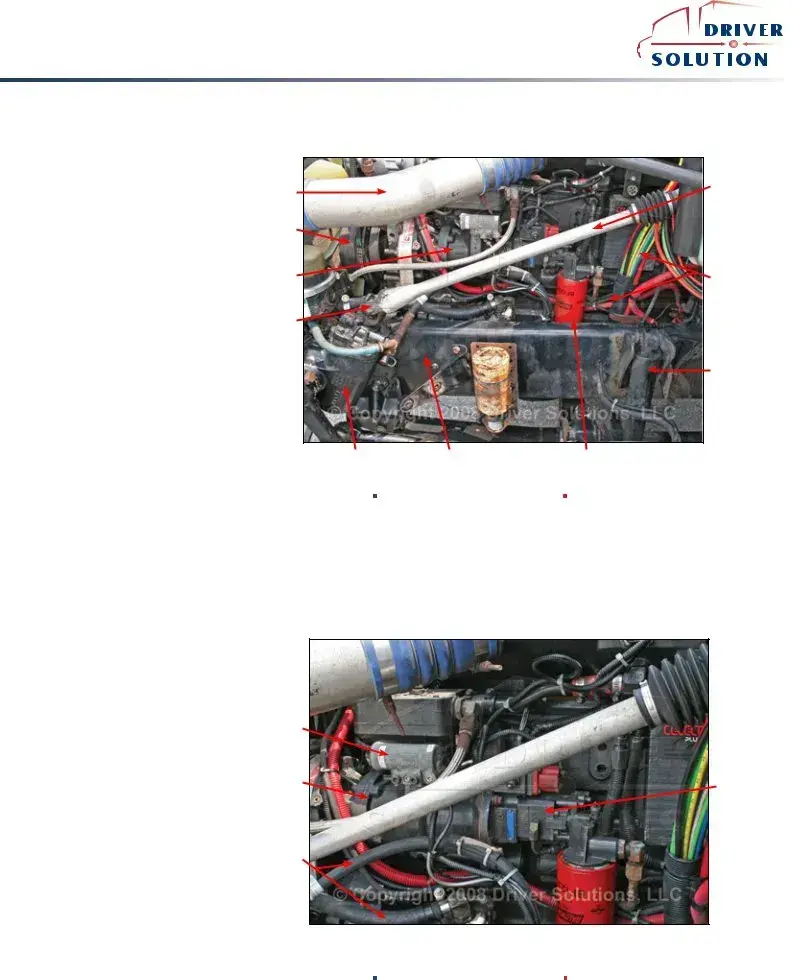
ENGINE COMPARTMENT - DRIVER SIDE CON’T |
||
|
|
|
|
o Mounted properly |
|
|
|
o Hoses attached and not leaking |
|
|
|
o Check for level and condition |
|
|
|
AIR COMPRESSOR |
|
|
|
o Mounted Securely |
Power Steering |
|
|
o No missing bolts or parts |
|
|
|
Reservoir |
|
|
|
o No air leaks at lines |
|
|
|
o Check if gear or belt driven |
|
|
|
o Belt no more than ¾ inch of play |
|
|
|
o Belts not cracked or frayed |
|
|
|
STEERING GEAR BOX |
Steering Gear |
|
|
Box |
|
|
|
o Mounted properly |
|
|
|
o No missing parts, nuts or bolts |
|
|
|
o Lines and hoses not leaking or |
Pitman Arm |
|
|
broken |
|
|
|
|
|
|
|
STEERING LINKAGE |
|
|
|
o Pitman arm, Drag link, Steering |
|
|
|
knuckle, Tie rods and tie rod ends |
|
|
|
o Not cracked, bent or broken |
Spring Mount |
Drag Link |
Leaf Spring |
o Castle nuts and cotter pins |
|
|
|
o Not missing and in place |
|
|
|
Reference Items |
Air Governor
Air Compressor
Engine Oil Pan
2
Class A CDL
 ®
®
AIR COMPRESSOR o Mounted Securely
o No missing bolts or parts o No air leaks at lines
o Check if gear or belt driven
o Belt no more than ¾ inch of play o Belts not cracked or frayed
STEERING GEAR BOX
o Mounted properly
oNo missing parts, nuts or bolts o Lines and hoses not leaking or broken
ENGINE COMPARTMENT - DRIVER SIDE CON’T
Engine Air Duct
Work
Fan Belts
Gear Driven Air
Compressor
Steering
Steering Column
Additional Hoses & Wiring
Shock Absorber
Steering Gear Box |
Frame Rail |
Fuel Filter |
Reference Items |
||
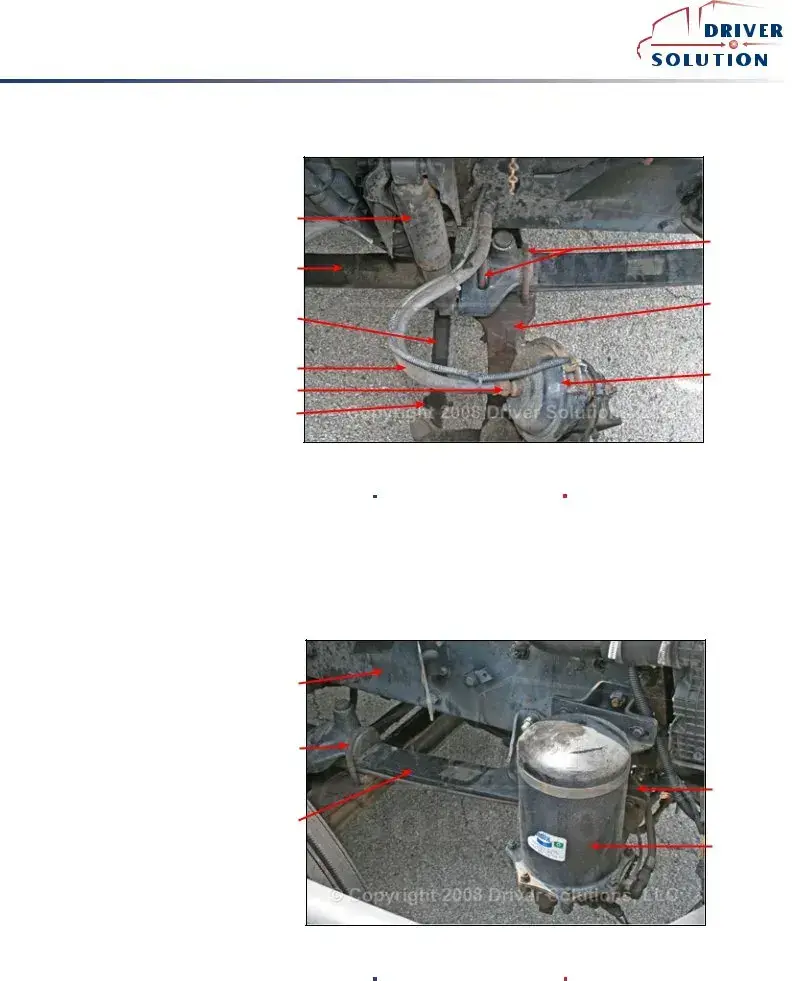
ENGINE COMPARTMENT - AIR COMPRESSOR
AIR COMPRESSOR o Mounted Securely
o No missing bolts or parts o No air leaks at lines
o Check if gear or belt driven
o Belt no more than ¾ inch of play o Belts not cracked or frayed
Air Governor
Gear Driven Air Compressor
Hoses
Fuel Pump
Reference Items |
3
Class A CDL
 ®
®
FRONT SUSPENSION
LEAF SPRINGS
o Not shifted or out of place
oNot cracked, broken or missing
SPRING MOUNTS
oMounted securely- front, back, and
oNot cracked or broken
SHOCK ABSORBER
oMounted Securely
oNot bent or dented o Not leaking
Shock Absorber
Leaf Spring
Tie Rod
Air Hose
Air LIne
Tie Rod End
Axle |
Service Brake |
Chamber |
Reference Items |
LEAF SPRINGS
o Not shifted or out of place
oNot cracked, broken or missing
SPRING MOUNTS
oMounted securely- front, back, and
oNot cracked or broken
SHOCK ABSORBER
oMounted Securely
oNot bent or dented o Not leaking
FRONT SUSPENSION CON’T
Frame Rail
Leaf Spring
Air Dryer location varies depending on model.
Located either behind the front bumper or behind the fuel tank.
Reference Items |
4
Spring Mount
Air Dryer
Class A CDL
 ®
®
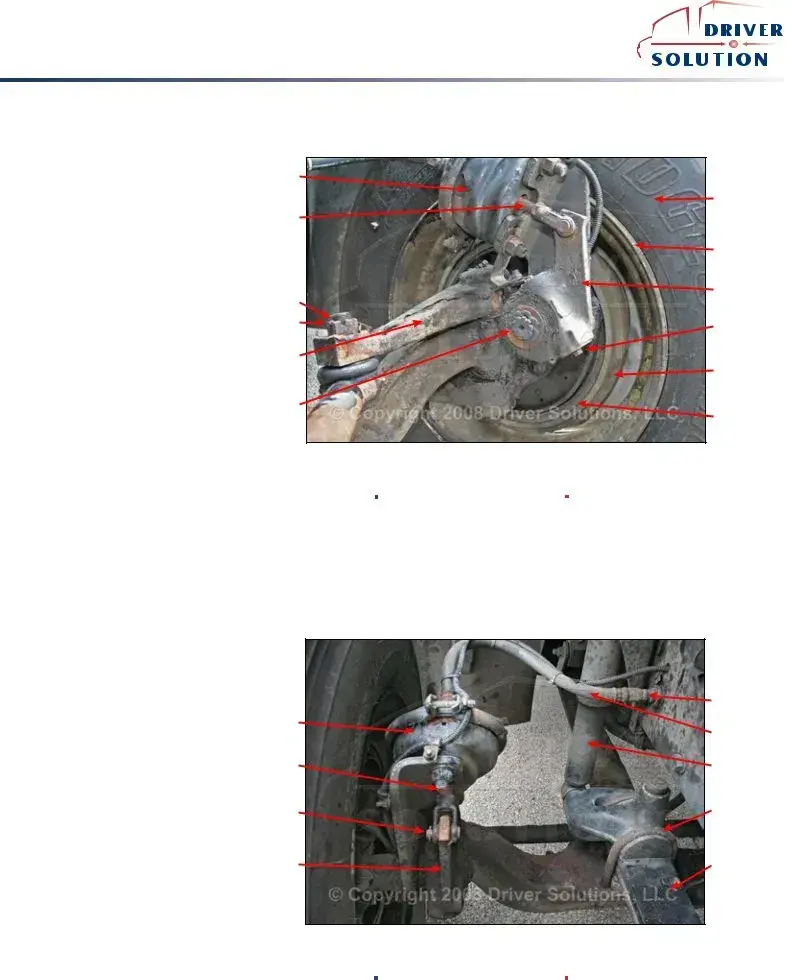
HOSES AND LINES |
|
FRONT BRAKES |
|
|
|
||
o Mounted securely |
Service Brake |
|
|
o |
Not leaking |
|
|
o |
Not cracked or frayed |
Chamber |
|
|
Tire |
||
|
|
|
|
CHAMBER |
Push Rod |
|
|
o Mounted securely |
|
|
|
o Not dented or damaged |
|
Wheel |
|
o |
Not leaking |
|
|
SLACK ADJUSTER |
|
Slack Adjuster |
|
o |
No more than 1 inch of free play at |
Castle Nut |
|
the push rod with the brakes released. |
Cotter Pin |
Adjustment Nut |
|
o |
Not bent, broken, loose, or missing |
|
|
|
|
||
parts |
Steering |
|
|
|
|
Knuckle |
Brake Drum |
DRUMS |
|
||
|
|
||
o |
Not cracked, broken or dented |
|
|
o |
No oil leaking from inner oil seal, |
Snap Ring |
|
free of debris |
|
Brake Lining |
|
LININGS |
|
|
|
oNo cracked, broken or missing parts o Not less than ¼ inch in thickness
Reference Items |
HOSES AND LINES o Mounted securely o Not leaking
o Not cracked or frayed
CHAMBER
o Mounted securely
oNot dented or damaged
oNot leaking
SLACK ADJUSTER
oNo more than 1 inch of free play at the push rod with the brakes released.
oNot bent, broken, loose, or missing parts
DRUMS
oNot cracked, broken or dented
oNo oil leaking from inner oil seal, free of debris
LININGS
oNo cracked, broken or missing parts
oNot less than ¼ inch in thickness
FRONT BRAKES CON’T
Service Brake
Chamber
Push Rod
Clevis Pin &
Cotter Pin
Slack Adjuster
Reference Items |
Air Line
Air Hose
Shock Absorber
Spring
5
Class A CDL
 ®
®
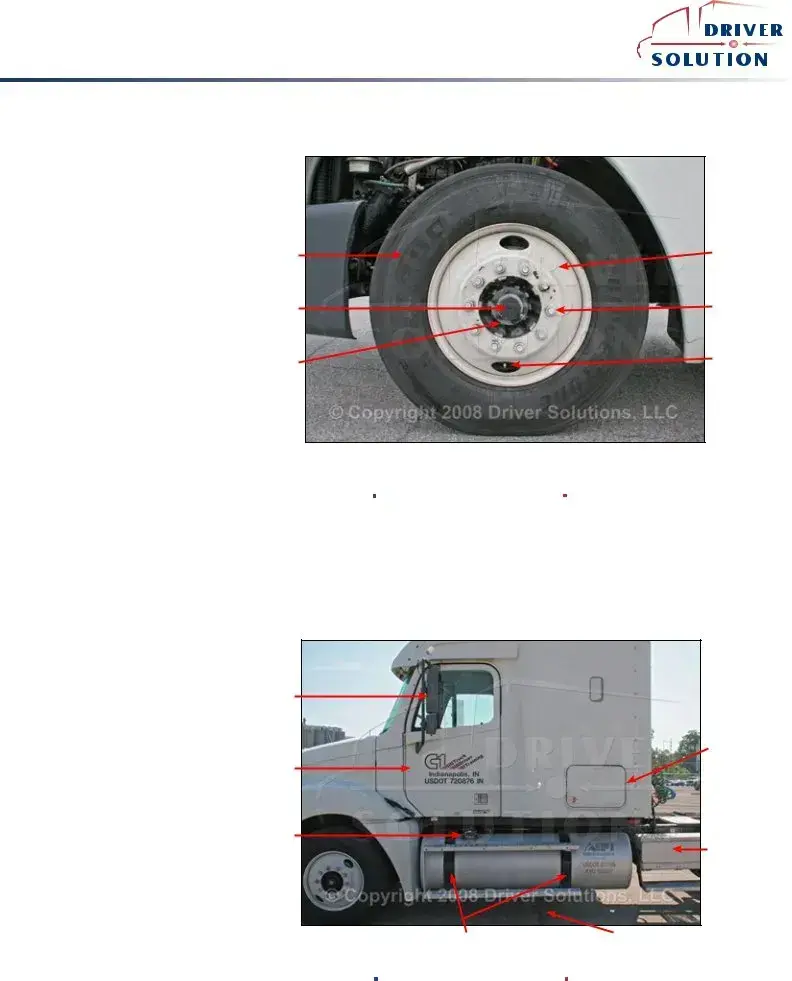
FRONT WHEEL
TIRES
oProper inflation – company or manufacturer specification
o No bulges, cuts, or retreads
o Minimum tread depth of 4/32”
RIMS
oNot bent, cracked, No welding repairs.
LUG NUTS
oNone are missing
oTight – no shinny threads, or rust trails
OUTER HUB OIL SEALS
oNot leaking, no missing bolts o Proper oil level
Tire |
Wheel |
|
Hub Oil |
Lug Nut |
|
Reservior |
||
|
||
Outer Hub |
Valve Cap |
|
Oil Seal |
|
Reference Items |
DRIVER FUEL AREA
DRIVER’S DOOR
oDoor opens and closes properly
oSeal is in good condition
DRIVER’S MIRRORS
oClean and free of obstruction
oNot cracked, broken, or damaged
oMounted securely
FUEL TANK
oMounted securely
o Not leaking
o Seal in cap OK
Mirror |
Storage |
Compartment |
Door |
Cap & Seal |
Battery Box & |
Cover |
Saddle Mounts |
Leaks |
Reference Items |
6
Class A CDL
 ®
®
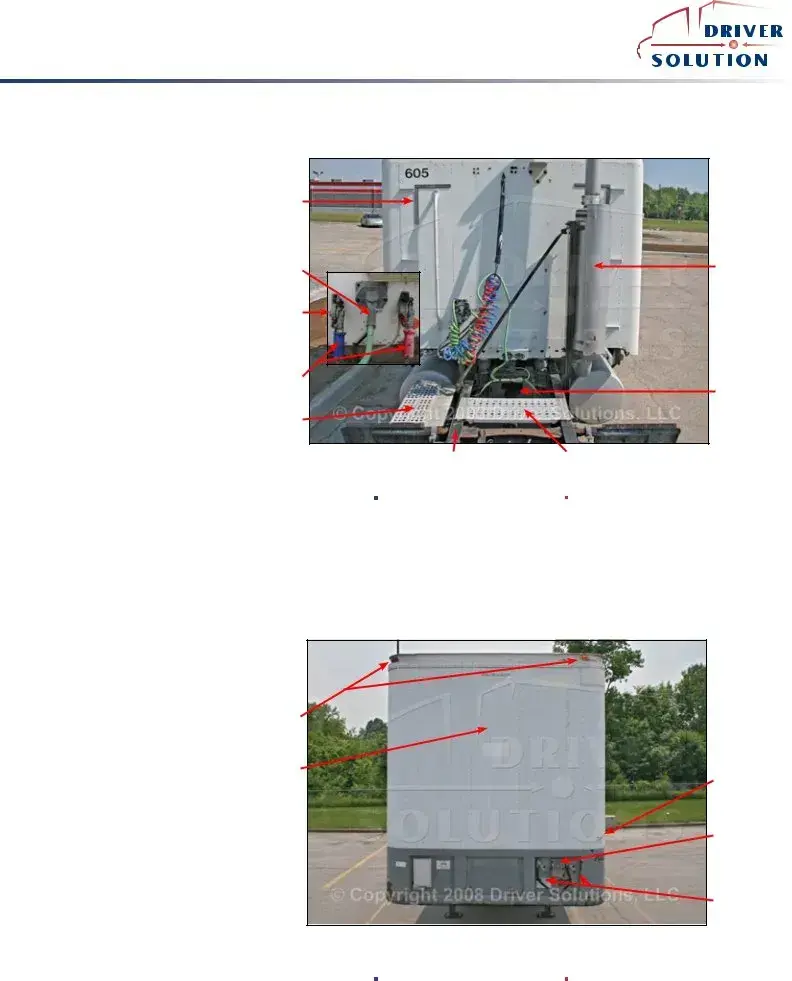
AIR LINES & ELECTRIC LINE o Not cracked, frayed, cut, or kinked o Mounted securely at the glad hands o Not leaking
BEHIND THE CAB
BATTERY BOX & BATTERIES o Box is mounted properly
o Batteries are secure in the box o Lid secure
o Connections not corroded
CATWALK
o Mounted properly
oNot, missing, or damaged
oFree of obstructions
DRIVE SHAFT
oNot bent, or damaged
oCoupling,
EXHAUST SYSTEM
oSecurely mounted
oNot dented or damaged
oNot leaking
FRAME
oNot cracked, or damaged
oNo missing bolts
oNo illegal welds
LIGHTS & REFLECTORS
oClean and working
Lights & |
|
Reflectors |
|
Electrical Line |
Exhaust |
Glad Hand |
|
Service & |
|
Emergency |
|
Airlines |
Drive Shaft |
|
|
Battery Box & |
|
Batteries |
|
Frame |
Catwalk |
Reference Items |
FRONT OF TRAILER
HEADER BOARD
oNo holes or missing rivets
LIGHTS & REFLECTORS
oNone broken, cracked, or missing
oWorking and proper color of amber
Lights |
Header Board |
Height Sticker
Electric Hookup
Air Line
Reference Items |
7
Class A CDL
 ®
®
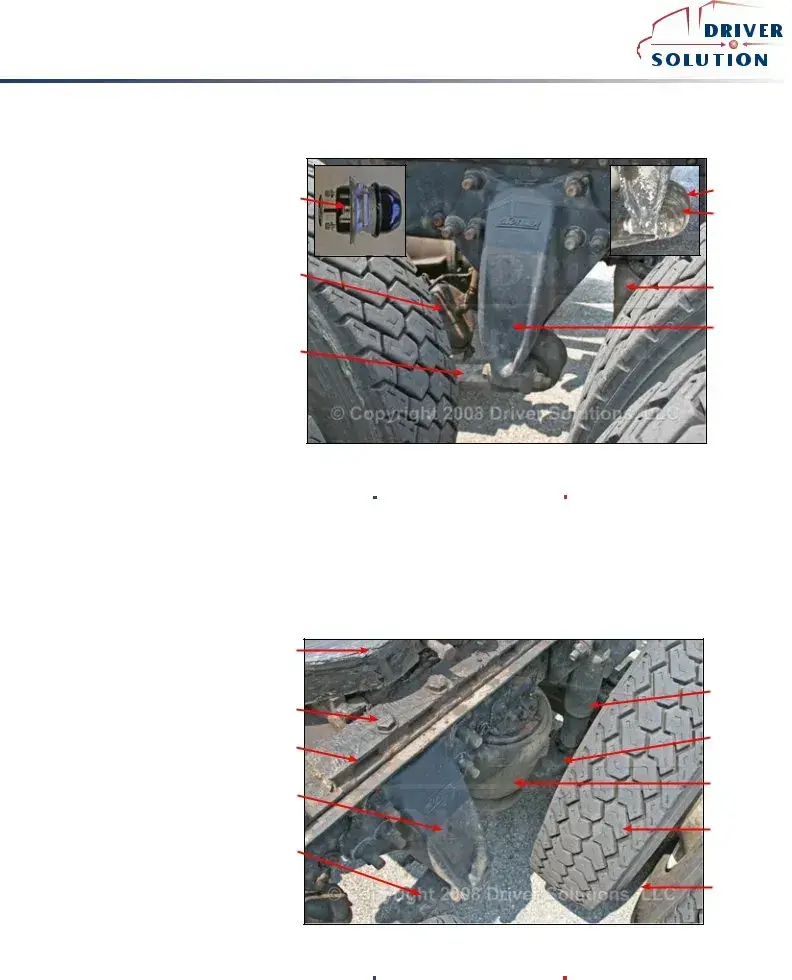
DRIVE AXLE SUSPENSION
CONTROL ARM MOUNT o Mounted securely
o Not bent, broken or damaged
CONTROLARM
oMounted securely – front, back, and
o Not cracked, or broken
SHOCK ABSORBER
o Mounted Securely
oNot bent, dented or leaking
TORSION BAR
oMounted Securely
oNot bent, broken or damaged
AIR BAGS
oMounted Securely
o Not leaking
Spring Brake |
Torsion Bar |
|
|
Chamber |
Control Arm |
|
|
Spring Brake |
|
Chamber |
Air Bag |
|
|
|
Control Arm |
|
Mount |
Control Arm |
|
Reference Items |
DRIVE AXLE SUSPENSION CON’T & FIFTH WHEEL
CONTROL ARM MOUNT o Mounted securely
o Not bent, broken or damaged
CONTROLARM
oMounted securely – front, back, and
o Not cracked, or broken
SHOCK ABSORBER
o Mounted Securely
oNot bent, dented or leaking
TORSION BAR
oMounted Securely
oNot bent, broken or damaged
AIR BAGS
oMounted Securely
o Not leaking
Skid Plate |
|
|
Shock Absorber |
Mounting |
|
Bolts |
|
Locking |
Spring |
|
|
Pins |
|
Control Arm |
Air Bag |
|
|
Mount |
|
|
Tire |
Control Arm |
|
|
Space |
Reference Items |
8
Class A CDL
 ®
®
HOSES AND LINES o Mounted securely o Not leaking
o Not cracked or frayed
CHAMBER
o Mounted securely
oNot dented or damaged
oNot leaking
SLACK ADJUSTER
oNo more than 1 inch of free play at the push rod with the brakes released.
oNo bent, broken, loose, or missing parts
DRUMS
oNot cracked, broken or dented
oNo oil leaking from inner oil seal, free of debris
LININGS
oNo cracked, broken or missing parts
oNot less than ¼ inch in thickness
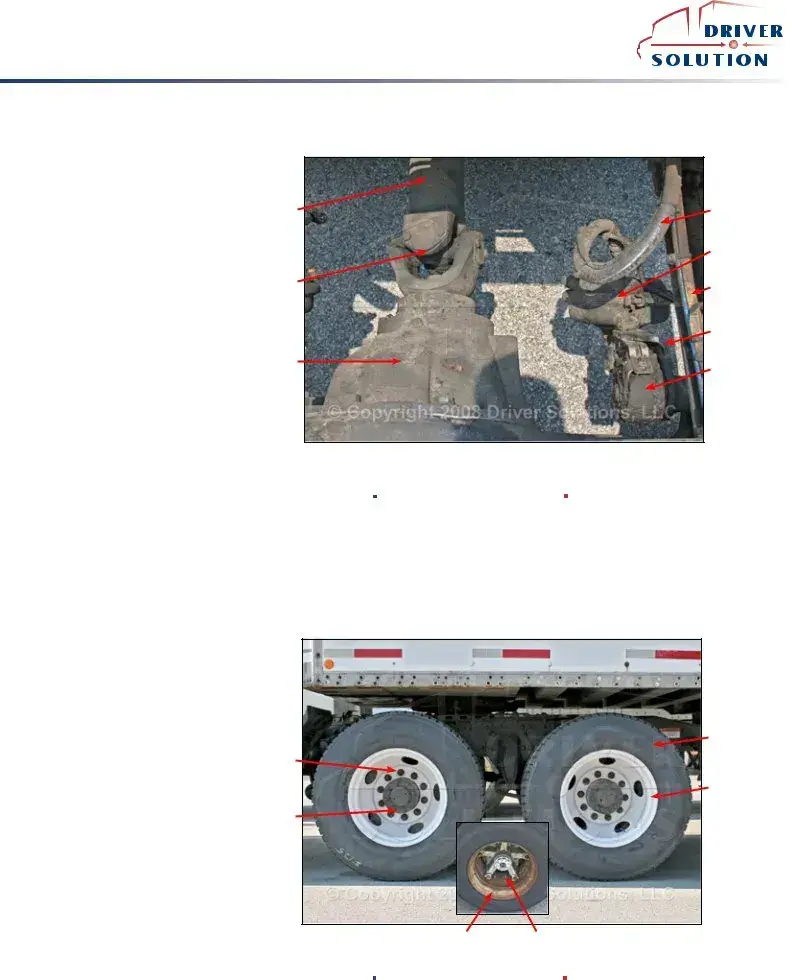
DRIVE BRAKES & DRIVE SHAFT
Drive Shaft
Universal Joint
Differential
Reference Items |
Air Line
Service Brake Chamber
Frame
Brake Chamber Mount
Slack Adjuster
TIRES
oProper inflation - company or manufacturer specification.
o No bulges or cuts, can have retreads o Minimum tread depth of 2/32”
RIMS
oNot bent or cracked
oNo welding repairs
LUG NUTS
oNone missing
oTight – no shinny threads, or rust trails
OUTER AXLE SEAL
oNot leaking, no missing bolts
SPACE OR SPACER
oCheck for objects between wheels
oCheck for proper spacing
Lug Nuts
Outer Axle Seal
DRIVE WHEELS
Tire
Bud Rim
Dayton Rim |
Spacer |
Reference Items |
9
Class A CDL
 ®
®
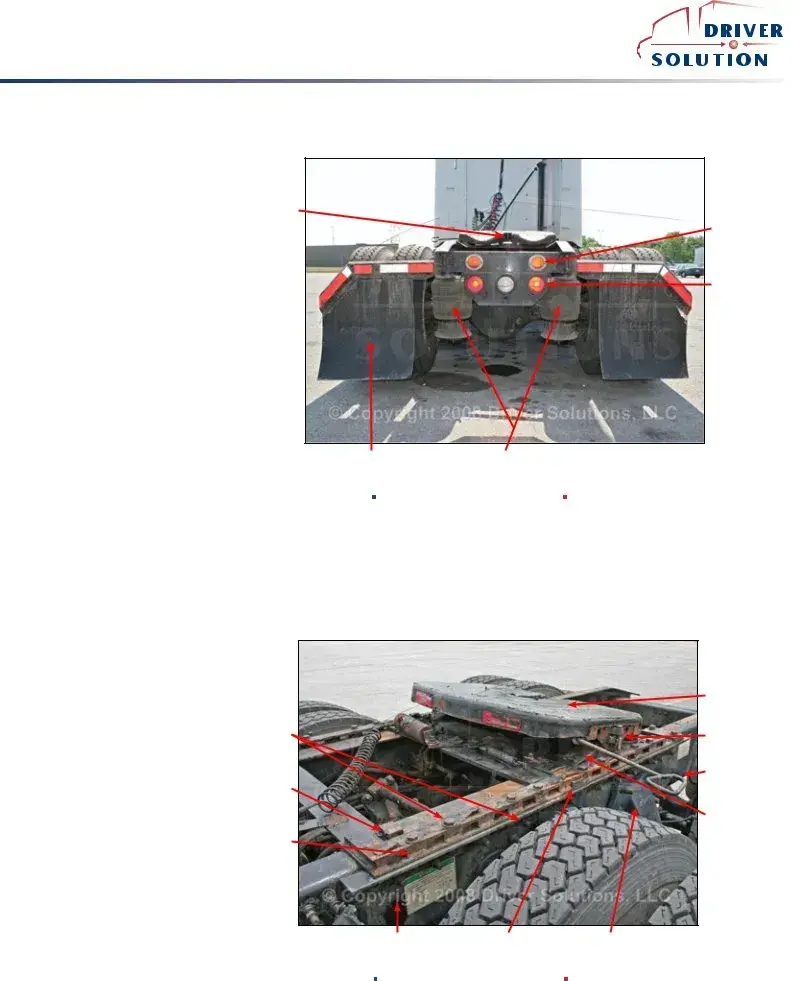
REAR OF TRACTOR
LIGHTS & REFLECTORS o Not cracked, or broken
o Working and proper color
SPLASH GUARDS
oNot missing or torn and properly mounted
Locking Jaws |
|
|
Reflectors |
|
Lights |
Splash Guard |
Air Bags |
Reference Items |
MOUNTING BOLTS
oNone missing or broken
RELEASE ARM
oNot bent, broken, or damaged
oEngaged in the lock position
LOCKING PINS
oNo missing or broken parts
oEngaged and locked
PLATFORM
oSecurely holds skid plate
oNot cracked, or broken
SKID PLATE
oMounted properly on the platform
oProperly greased
oTilting freely
Mounting Bolts
Slide Stops (all 4 corners)
COUPLING SYSTEM
Skid Plate |
Pivot Pin |
Release Arm |
Platform |
KING PIN |
Welds |
oNot broken, bent, or damaged
APRON
oNo bends or damage to visible portions
GAP
oCheck that the trailer apron is lying flat on the fifth wheel skid plate
Frame |
Slide Locking Pin |
Spring Mount |
JAWS |
Reference Items |
|
|
|
|
o Check that the locking jaws are fully |
|
|
closed around the shank of the king pin |
10 |
|
More About Pre Trip Inspection Checklist
What is the purpose of the Pre Trip Inspection Checklist?
The Pre Trip Inspection Checklist is designed to ensure that vehicles are safe and ready for operation before they hit the road. By conducting this inspection, drivers can identify any potential issues that could compromise safety or lead to breakdowns during travel.
Who is responsible for completing the Pre Trip Inspection Checklist?
The driver of the vehicle is primarily responsible for completing the Pre Trip Inspection Checklist. It is their duty to ensure that the vehicle is in good working condition before starting any trip. This responsibility helps promote safety for both the driver and others on the road.
What items are typically included in the Pre Trip Inspection Checklist?
Common items on the checklist include checking the brakes, lights, tires, fluid levels, and mirrors. Additionally, drivers should inspect the vehicle's exterior for any visible damage and ensure that emergency equipment, such as fire extinguishers and first aid kits, are present and in good condition.
How often should the Pre Trip Inspection Checklist be completed?
The checklist should be completed before every trip. Even if a vehicle was inspected recently, conditions can change. A daily inspection helps catch any new issues that may have developed since the last check.
What should a driver do if they find a problem during the inspection?
If a driver discovers a problem during the inspection, they should not operate the vehicle until the issue is resolved. It is essential to report the problem to a supervisor or maintenance team for further evaluation and repair. Safety should always come first.
Is there a specific format for the Pre Trip Inspection Checklist?
While the format may vary by organization, the checklist should clearly outline all items that need to be inspected. It can be a printed form, a digital document, or an app. The key is that it should be easy to follow and allow for clear documentation of any findings.
What happens if a driver fails to complete the Pre Trip Inspection Checklist?
Failing to complete the checklist can lead to serious consequences. It may result in safety hazards, legal liabilities, and disciplinary actions from the employer. Regular inspections are crucial for maintaining compliance with safety regulations and ensuring the well-being of everyone on the road.
Can the Pre Trip Inspection Checklist be used for different types of vehicles?
Yes, the Pre Trip Inspection Checklist can be adapted for various types of vehicles, including cars, trucks, and buses. However, the specific items on the checklist may differ depending on the vehicle type and its unique requirements. Always tailor the checklist to fit the vehicle being inspected.
Are there any legal requirements regarding the Pre Trip Inspection Checklist?
Yes, federal and state regulations often require drivers to conduct pre-trip inspections, especially for commercial vehicles. These regulations are in place to promote safety and reduce accidents caused by vehicle malfunctions. It is important for drivers to be aware of and comply with these legal obligations.
How can a driver keep a record of completed inspections?
Drivers should maintain a record of completed inspections by keeping copies of the signed checklists. Many organizations also use digital systems that automatically log inspection dates and findings. Keeping accurate records is essential for accountability and can be useful in case of audits or inspections by regulatory authorities.
Key takeaways
Completing the Pre Trip Inspection Checklist is crucial for ensuring safety and compliance. Here are key takeaways to keep in mind:
- Thoroughness is Essential: Inspect every component listed on the checklist. Missing a detail can lead to safety issues.
- Document Everything: Record any discrepancies or issues you find during the inspection. This documentation is vital for accountability.
- Follow the Checklist Order: Stick to the sequence provided in the checklist to ensure a comprehensive review of all areas.
- Use Clear Language: When noting issues, use straightforward language. This clarity helps others understand the situation quickly.
- Check Off Completed Items: Mark each item as you complete it. This practice ensures nothing is overlooked.
- Review Before Submission: Double-check the completed checklist before submitting it. An accurate form prevents delays and ensures compliance.
- Communicate Findings: Share any significant issues with your team immediately. Prompt communication can prevent accidents.
- Stay Updated: Familiarize yourself with any changes to the checklist or inspection procedures. Regular updates can improve safety and efficiency.
Adhering to these key points will help maintain safety standards and promote a culture of diligence within the team.
Form Attributes
| Fact Name | Description |
|---|---|
| Purpose | The Pre Trip Inspection Checklist is designed to ensure that vehicles are safe and compliant before they hit the road. |
| Frequency | Drivers are required to complete this checklist before every trip, promoting safety and accountability. |
| Regulatory Compliance | This form is often mandated by the Federal Motor Carrier Safety Administration (FMCSA) regulations. |
| State-Specific Variations | Some states may have additional requirements or specific forms based on local laws; for example, California Vehicle Code Section 34500 outlines specific inspection criteria. |
Other PDF Forms
Texas Temporary Tag - This form is an essential document for lawfully operating a newly purchased vehicle.
For those looking to complete the transfer of motorcycle ownership in Georgia, utilizing a Georgia Motorcycle Bill of Sale form is crucial; it not only provides legal documentation but can also be accessed through resources like OnlineLawDocs.com to ensure that all necessary information is accurately captured and the process is seamless.
What Documents Do I Need to Sell My Car? - Co-owners named with "AND" require signatures from all parties involved.
Dos and Don'ts
When filling out the Pre Trip Inspection Checklist form, it's important to follow certain guidelines to ensure accuracy and compliance. Here are five things you should and shouldn't do:
- Do: Review the checklist thoroughly before starting your inspection.
- Do: Use clear and legible handwriting when filling out the form.
- Do: Double-check all entries for completeness and accuracy.
- Do: Report any issues or concerns immediately to your supervisor.
- Do: Sign and date the form after completion.
- Don't: Rush through the inspection; take your time to ensure nothing is overlooked.
- Don't: Use abbreviations or unclear terms that may confuse others.
- Don't: Leave any sections of the form blank unless instructed.
- Don't: Ignore minor issues; they could lead to bigger problems later.
- Don't: Forget to keep a copy of the completed checklist for your records.